
How Shopify Stores Audit False Declines
Audit Shopify payment declines to recover legitimate revenue: baseline metrics, match complaints to attempts, map app stack, and test fixes.

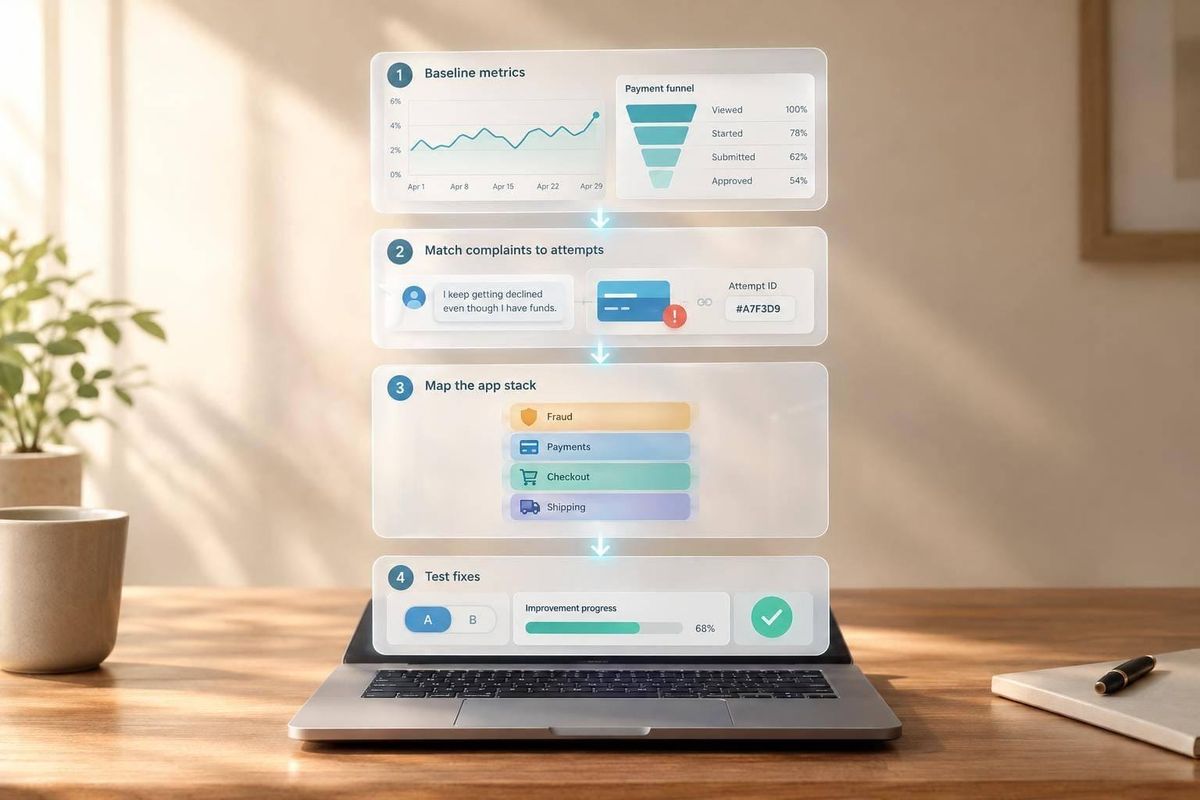
I start a false-decline audit with payment records - not abandoned carts. I use a 30- or 90-day window to check which payments failed, who rejected them, and whether the customer later paid.
Here’s my process:
- Build the baseline: Measure payment approval and retry recovery, keeping issuer declines, checkout blocks, and technical errors separate.
- Match the records: Link complaints and checkout drop-offs to payment attempts. A successful retry is a clue, not proof of a false decline.
- Check the tools: Use StoreCensus to map detected apps, then verify active settings and logs in Shopify and provider dashboards.
- Test one fix at a time: Set rollback limits and track recovered sales alongside refunds, fraud losses, chargebacks, and review workload.
I turn the results into a dashboard, a ranked case queue, and a fix list. The goal is <u>more legitimate revenue after losses</u> - not just a higher approval rate.
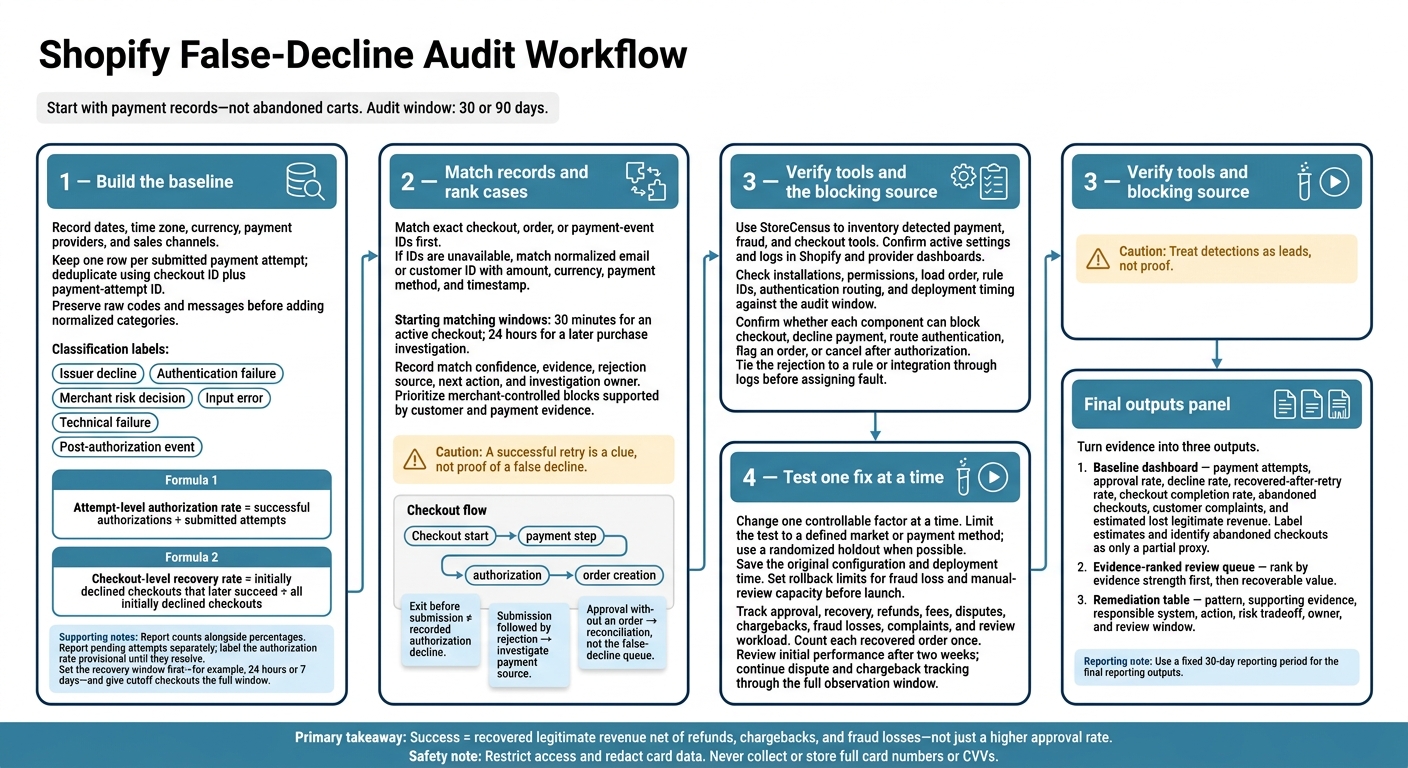
Shopify False-Decline Audit Workflow
Step 1: Set a Baseline and Classify Payment Failures
Record the exact start and end dates, the store’s time zone, currency, payment providers, sales channels, and any major events that could skew results. Request merchant-approved access to Shopify payment reports, order and abandoned-checkout exports, payment-provider dashboards or logs, customer-support tickets, fraud and risk-decision records, and analytics showing checkout progression.
Shopify records payment events in abandoned-checkout timelines. These events may explain why a payment failed.[5] For completed orders, payment events appear in the order timeline, with additional gateway information where supported.[7]
Keep a source-and-field inventory for each integration. Include the retrieval method, export date, reporting time zone, date-range and row limits, pagination, retention, and missing fields. If bulk exports aren’t available, use an API extraction, scheduled report, or provider CSV. Mark missing fields explicitly. Never collect passwords, full card numbers, or CVVs.
Use this inventory to trace every decline record to its source before comparing it with complaints and checkout behavior.
Measure Payment Approval and Retry Recovery
Calculate Attempt-level authorization rate = successful authorizations ÷ submitted attempts.
Define how you count attempts once, then keep one row per submitted payment attempt. Deduplicate records using the checkout ID plus payment-attempt ID. When stable IDs are missing, document your fallback matching method. Exclude pending attempts from the numerator, report their count separately, and label the rate provisional until they resolve.
Calculate Checkout-level recovery rate = initially declined checkouts that later succeed ÷ all initially declined checkouts.
Set the recovery window before calculating the rate:
For example, use 24 hours or 7 days.
Link each recovered checkout to its original failed attempt - not a later, unrelated order. Give checkouts near the audit cutoff the full recovery window. Report counts alongside percentages, plus capture, dispute, and chargeback totals. A later void or cancellation does not turn the original authorization into a decline.
Export Decline Codes and Identify Rejection Sources
Preserve raw codes and messages, then add a normalized category. Retain checkout, order, and transaction IDs; attempt numbers; timestamps with time zones; amounts and currencies; payment methods and providers; AVS, CVC, authentication, and risk results; retry timestamps; and final outcomes. Save the source filename or record reference.
Keep processor and network codes separate. Network codes can contain two to four digits or be absent.[8] Use the table below to build the incident file and rank high-volume or unresolved sources for Step 2.
Classify each failed attempt by its evidence source first. Then investigate the buckets with the strongest supporting evidence.
| Primary category | Evidence to retain | Evidence limit | Next action |
|---|---|---|---|
| Issuer decline | Processor decline code, network code, issuer response, or failed authorization | Treat do_not_honor as an unresolved issuer decline.[6] |
Group by raw code and retry outcome without blind retries. |
| Authentication failure | authentication_required, authentication_not_handled, failed 3-D Secure result, or incomplete challenge |
A failed challenge does not prove the card is unusable.[6] | Check whether authentication started, displayed, and completed. |
| Merchant risk decision | Block reason, rule ID, risk score | The issuer may never have seen the attempt. | Review the blocking rule and customer evidence. |
| Input error | Invalid card number, expiration, security code, or billing-address mismatch | Broad decline messages may hide the specific error. | Check field validation, billing data, and recovery after corrections. |
| Technical failure | Timeout, gateway error, API error, unavailable provider, or interrupted redirect | The final payment state may still be unknown. | Reconcile provider logs and webhook events before classifying. |
| Post-authorization event | Void, cancellation, expired authorization, failed capture, refund, or chargeback | These are not initial authorization declines. | Track separately in capture, cancellation, and loss reporting. |
In Step 2, use these buckets to match complaints and checkout drop-offs to specific payment attempts. This makes matching and tracing faster and gives each classification a clearer evidence trail.
sbb-itb-61169e3
Step 2: Match Complaints and Checkout Drop-Offs to Payment Records
Match Customer Complaints to Failed Payments
Use the decline buckets from Step 1 to connect customer complaints to specific failed payment attempts.
Assign each complaint a case ID. Match exact checkout, order, or payment-event IDs first. If those aren't available, use a normalized email or customer ID alongside the amount, currency, payment method, and timestamp. Start with a 30-minute window for an active checkout or 24 hours for a later purchase investigation. Record your confidence in each match and restrict access to payment records.[9]
Tag repeated failures, authentication or 3-D Secure loops, billing or address mismatches, wallet success after card failure, duplicate submissions, and payments without an order record. Verify payment status before labeling a case as a missing order. Give priority to complaints where payment later succeeded through a retry or replacement order.
Report the share of declined checkouts linked to complaints, followed by the share of those complaint-linked checkouts that recovered. Show both counts alongside the shares.
Find Where Payment Checkouts Fail
Use checkout events to pinpoint whether a failure occurred before authorization, during authorization, or after approval.
Map the flow: checkout start → payment step → submission → authorization → order creation. An exit before submission isn't a recorded authorization decline. A submission followed by rejection needs payment-source analysis. An approval without an order needs reconciliation.
GA4 events such as begin_checkout, add_payment_info, and purchase can show where the flow breaks. They don't explain why it broke or confirm whether authorization succeeded.
Compare failure and recovery rates by payment method, customer country, device, browser, and order-value band, where available. Before blaming fraud rules, check for duplicate submissions, failed redirects, browser errors, and timing that lines up with an incident.
Log gaps in event coverage for each segment. Missing events do not prove no attempt. Before classifying an order as missing, reconcile approved payments against provider records and Shopify timelines. Order creation can be asynchronous.
Rank Cases by Evidence and Rejection Source
Prioritize merchant-controlled blocks connected to prior purchases, successful retries, or immediate payment-method switches. These are clues - not proof that a payment was legitimate. Billing details or authentication may have changed.
Keep confirmed fraud, issuer declines, authentication failures, technical failures, merchant-controlled risk blocks, and unresolved cases separate. For each case, record the supporting evidence, confidence, rejection source, next action, and investigation owner. Route approved payments without an order to reconciliation, not the false-decline queue.
Send the highest-confidence merchant-control cases into the app-stack review in Step 3.
Step 3: Verify the App Stack and Test Targeted Fixes
Map the App Stack With StoreCensus
Start with the highest-confidence merchant-controlled cases from Step 2. Map the checkout tools that could have caused those declines, then use the cases to decide which app, rule, or payment setting to inspect first.
Use StoreCensus to inventory detected payment, fraud, and checkout tools. Then confirm the active stack in Shopify admin and app dashboards. Treat detections as leads, not proof. Compare the stack with the audit window, and check installations, active settings, permissions, load order, and logs.
For each component, record its owner, purpose, checkout stage, the stage where it can act, and log location. Note whether it can block checkout, decline payment, route authentication, flag an order, or cancel an order after authorization.[10][12]
Check Risk Rules and Payment Integrations
Review country and IP blocks; velocity limits by card, email, device, or address; AVS/CVV requirements; authentication routing; address normalization; currency and market availability; and redirect or return URLs. Compare deployment timestamps with decline spikes.
Shopify Payments can decline transactions that fail AVS or CVV checks. Shopify Fraud Control can block checkout completion. Confirm what each component can stop before changing it.[11][13]
When escalating to a provider, include payment-attempt IDs, checkout IDs, timestamps, amounts, raw decline responses, authentication results, and rule logs. Ask the provider to confirm whether the rejection came from the issuer, routing, authentication, risk controls, or an integration error. Tie the decline to a rule or integration through logs before assigning fault.[14][15]
Once you identify the blocking source, test only that control in the next step.
Test Fixes With Fraud Limits
Change one controllable factor at a time: one rule threshold, one integration defect, or one retry message. Limit the test to a defined market or payment method. Use a randomized holdout when possible. If that isn’t possible, document the baseline and traffic mix.
Save the original configuration and deployment time. Before launch, set rollback limits for fraud loss and manual-review capacity.
Report approval, recovery, disputes, chargebacks, and review workload for the test window. Count each recovered order once, and separate recovered sales from net revenue after refunds, fees, and chargebacks.
Track complaints and fraud losses to check whether the fix reduces false declines without increasing fraud, disputes, or manual-review load. Review initial performance after two weeks. Continue tracking disputes and chargebacks through the full observation window before keeping the change.
Conclusion: Use a Consistent Audit Across Shopify Stores
After exporting declines, matching complaints, and checking the app stack, organize the findings into three outputs: a baseline dashboard, an evidence-ranked review queue, and a remediation table covering a fixed 30-day reporting period.
The dashboard must include payment attempts, approval rate, decline rate, recovered-after-retry rate, checkout completion rate, abandoned checkouts, customer complaints, and estimated lost legitimate revenue. Clearly label estimates. Treat abandoned checkouts as only a partial proxy for payment-related loss.[4][18]
Rank the final review queue by evidence strength first, then recoverable value. Verified customers with documented payment rejections should come before unmatched abandonment. Use the evidence-ranked queue from Step 2 to build the remediation table, with one row per recurring pattern. Assign a responsible system only when the records support that choice.
| Pattern | Supporting evidence | Responsible system | Action | Risk tradeoff | Owner | Review window |
|---|---|---|---|---|---|---|
| Repeated soft declines | Successful later retry | Issuer, routing, or retry logic | Add controlled retry or alternate payment-method messaging | Duplicate attempts or added processor costs | Payments lead | 14–30 days |
| Mobile post-submission drop-off | Mobile-only drop-off, failed payment events, session recordings, and support complaints | Checkout, payment integration, or theme/app layer | Test payment form, wallet, and app compatibility on mobile | Removing an app may reduce fraud or conversion controls | Engineering lead | 14 days |
| AVS/CVV declines from validated customers | Decline records and confirmed billing details | Shopify Payments fraud settings or issuer verification | Review automatic AVS/CVV rejection settings | Relaxing verification can increase card-not-present fraud | Fraud owner | 7–14 days |
Repeat the audit at onboarding, after payment or fraud-rule changes, and monthly for high-volume stores. Standardize the fields, not the thresholds. Keep each merchant’s payment providers, supported countries, average order value, customer profile, fraud tolerance, currency, traffic sources, and app configuration separate. Before using another store’s fraud thresholds or retry policy, validate the local decline mix and payment-provider behavior.
Limit access, redact card data, and store only the fields needed to match complaints, events, and outcomes. Never store full card numbers or CVVs.[16][17]
Report recovered dollars alongside refunds, chargebacks, fraud losses, complaints, and review workload. Measure success by recovered legitimate revenue net of refunds, chargebacks, and fraud losses.
FAQs
How can I confirm a decline was actually false?
Review actual transaction data, not just the vendor’s reported lift figures. Start with the payment processor’s reason codes. Specific explanations are more reliable than scores with no supporting data. Compare those codes with chargeback outcomes and review logs to check whether a transaction was blocked by mistake.
Also, verify that the fraud-control tool makes real-time API calls during checkout. Inactive scripts can lead to inaccurate declines or declines triggered by default.
How can I estimate revenue lost to false declines?
Use your actual transaction data, not generic vendor lift figures. Audit chargeback and authorization records to find transactions incorrectly flagged as fraud. Then review decline reason codes for patterns, such as bot-like typing speeds or fraud scores that lack supporting data.
To estimate revenue lost at checkout, multiply the number of false declines you identify by your average order value:
Estimated lost revenue = False declines × Average order value
How can I audit stores with incomplete payment logs?
When payment logs are incomplete, audit what happens at checkout instead of relying only on internal data. Check active JavaScript signatures and API calls to verify that fraud-prevention tools run - not just appear in policy text [1].
Use StoreCensus to track real-time app changes or removals that may point to payment-risk issues [1]. Compare available order exports with dashboard metrics to spot gaps, and bring logs from all client systems into one place [2][3].