WooCommerce Transactional Emails: Full Guide
Audit, customize, test, and monitor WooCommerce transactional emails from trigger to inbox — templates, delivery, authentication, and handoffs.

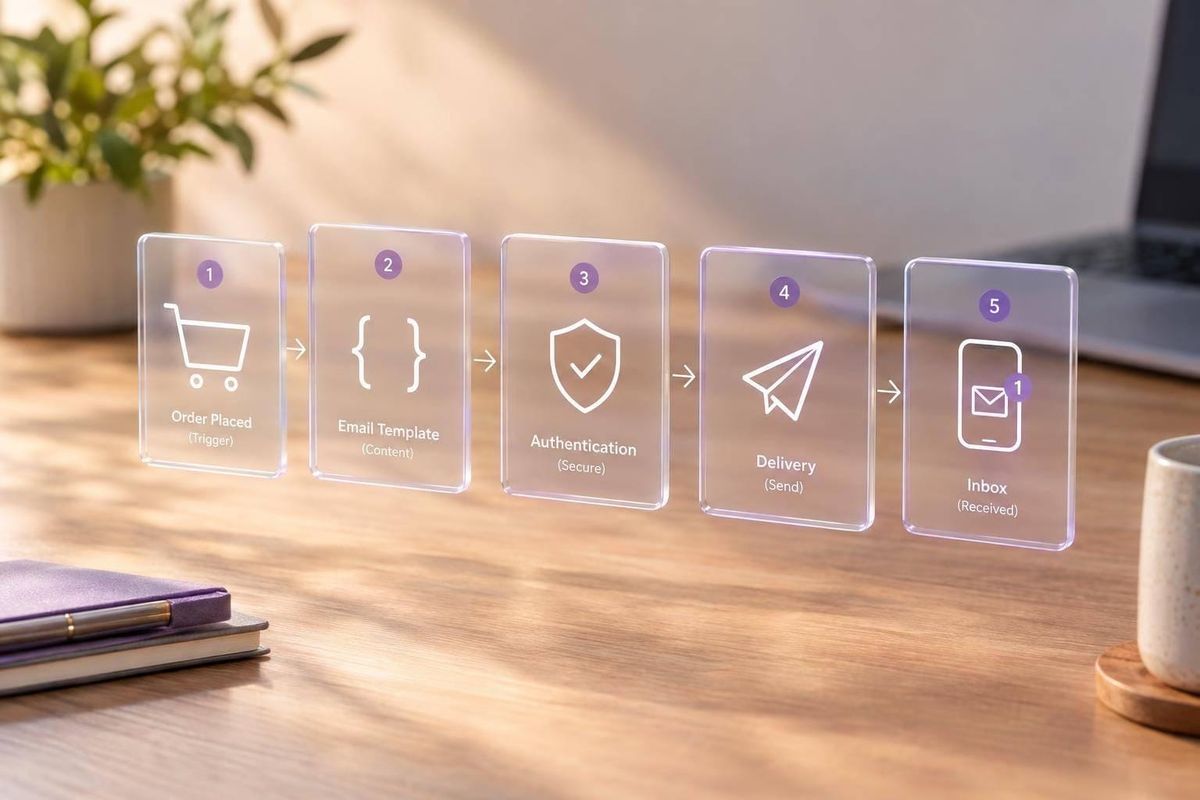
WooCommerce transactional emails need to reach customers - not just look good in a preview. I start at WooCommerce → Settings → Emails to check enabled notifications and recipients, then test an order and a password reset through to the inbox.
In this guide, I cover how to:
- Check triggers, settings, sender setup, and delivery logs.
- Choose settings, hooks, template overrides, or custom email classes.
- Test HTML and plain text across devices and email clients.
- Trace missing messages and duplicates.
- Track delivery, audit changes, and document client handoffs.
My rule: <u>test the whole path from event to inbox</u>. A $1,250.00 test order can help you check totals and status changes, but a successful send request alone does not prove delivery.
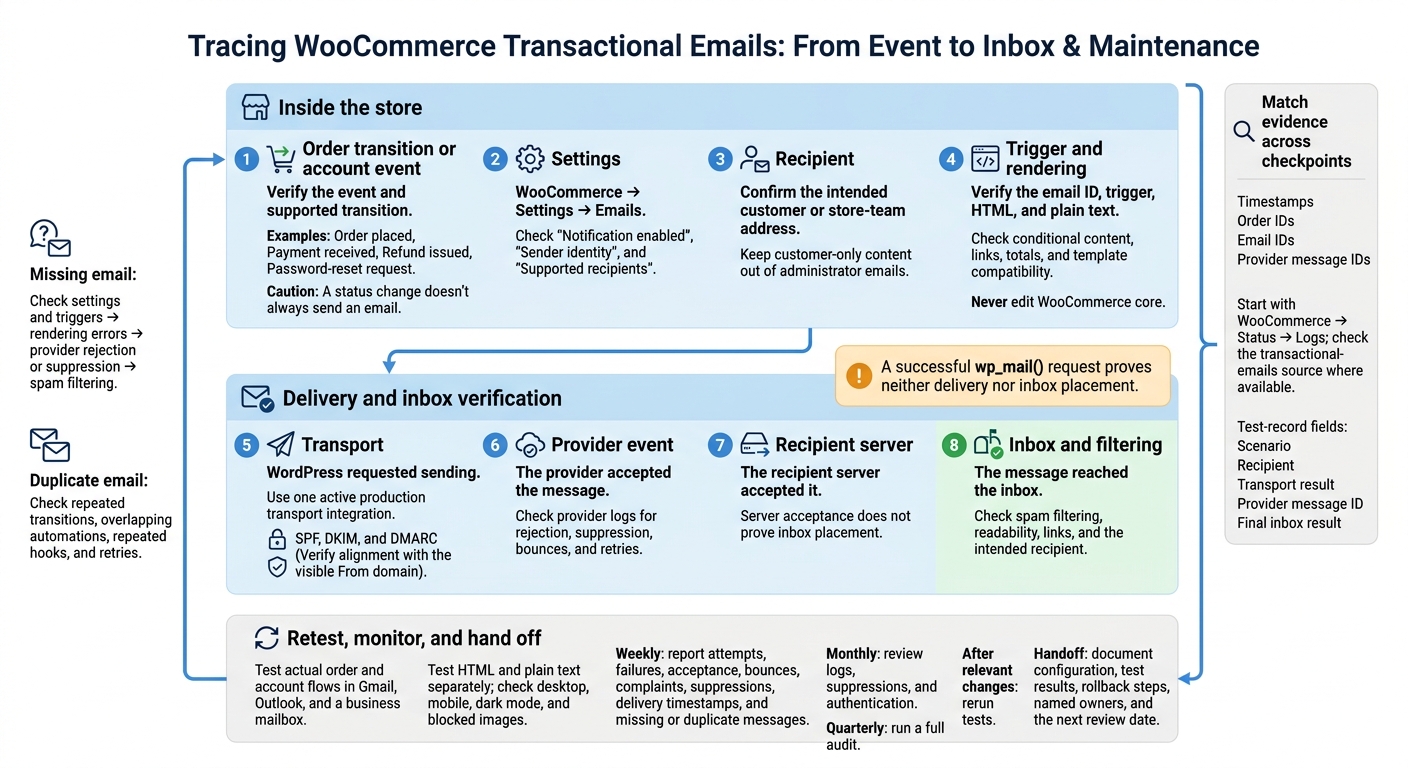
WooCommerce Email Testing: From Event to Inbox
How to Customize WooCommerce Post Purchase Email (No Code Needed)
sbb-itb-61169e3
Set Up Email Notifications and Delivery
Before changing settings, record your installed WooCommerce, WordPress, theme, and email extension versions. Notification labels, branding controls, and editor support differ by release. Save screenshots so you have a baseline for your audit.
Map Email Types, Triggers, and Recipients
Check each trigger against your installed version. In your audit record, include whether the email is enabled, its business owner, and the last test date. A status change doesn't always send an email.[1]
| Email type | Trigger to verify | Recipient | Automatic or manual | Audit status to record |
|---|---|---|---|---|
| New order | New order placed | Store team | Automatic | Recipients, delivery, duplicates |
| Canceled order | Order changes to Canceled from supported prior states | Store team | Automatic | Prior status, delivery |
| Failed order | Payment or order failure | Store team | Automatic | Gateway failure, retry behavior |
| On-hold order | Order enters On hold | Customer | Automatic | Transition, address, content |
| Processing order | Payment received or order moves to Processing | Customer | Automatic | Payment method, receipt |
| Completed order | Order marked Completed | Customer | Automatic | Fulfillment timing, receipt |
| Refunded order | Refund issued | Customer | Usually automatic | Full or partial refund, duplicates |
| Order details/customer invoice | Staff sends or resends invoice/details | Customer | Manual or workflow-dependent | Staff procedure, repeat sends |
| Customer note | Customer-visible note added to an order | Customer | Manual or workflow-dependent | Visibility, recipient |
| New account | Customer account created | Customer | Automatic | Registration path, links |
| Reset password | Password-reset request | Customer | Automatic | Delivery, link validity |
Include subscription, shipment, stock, security, and custom-status messages in the inventory. Record which extension handles each message and any separate controls needed to enable it. WooCommerce Subscriptions reminders need both the general reminder setting and the individual email notification enabled.[5] For canceled orders, check the prior status. Documented transitions include Pending payment, Processing, and On hold.[1]
Set Notification Options and Branding
With your trigger map in place, review what customers and staff will see. Go to WooCommerce → Settings → Emails to set supported recipients, subjects, headings, additional content, and placeholders. Give each store alert an owner.
Approve the sender name, store-domain address, logo, colors, footer, and support contact using the controls available in your version. Test placeholders with the relevant order, account, or refund. Don't disable a store email unless you have a tested replacement, a documented trigger, an owner, and a rollback procedure.[1][4]
Verify Sender Authentication and Delivery
Once the content is ready, check that messages leave your site and reach inboxes. Use a maintained SMTP or transactional-mail integration that provides event logs. Keep the store-domain From address consistent, and use a monitored reply-to address.
Verify SPF, DKIM, and DMARC, including alignment with the visible From domain. Maintain one SPF record and validate all legitimate senders before enforcing DMARC.
Test actual order and account flows in Gmail, Outlook, and a business mailbox. Review message headers and mail-provider events, checking each stage:
- WordPress requested sending.
- The provider accepted the message.
- The recipient server accepted it.
- The message reached the inbox.
A successful wp_mail() request proves neither delivery nor inbox placement. Check WooCommerce → Status → Logs before changing templates.[2][3]
Customize Email Templates, Hooks, and Classes
Choose the Right Customization Method
Once delivery is stable, change only the layer that needs work. Start with the smallest change that keeps the email auditable. Before choosing a method, record the email ID, trigger, recipients, required content, conditional rules, and HTML/plain-text needs. Also note any order or customer data dependencies, whether the change must survive a theme replacement, and the exact template or hook source.
Use block templates only for visual changes. Support depends on the installed release.
| Requirement | Preferred method | Implementation location | Maintenance risk |
|---|---|---|---|
| Change a subject, heading, recipient, or enable/disable setting | WooCommerce settings or email-specific filters | WooCommerce → Settings → Emails or a site-specific plugin | Low |
| Add a conditional note | Action hook | Site-specific plugin | Low to moderate |
| Change order-detail markup | PHP template override | Child theme’s woocommerce/emails/ directory |
Moderate to high |
| Create a new workflow notification | Extension or custom WC_Email class |
Site-specific plugin | Moderate; requires trigger and duplicate-send testing |
| Edit an eligible email visually | Block Email Editor | WooCommerce-supported block email templates | Low to moderate, depending on the installed release |
Find and Override Email Template Files
Copy only the file you need, keeping its relative path as shown below. Plain-text overrides belong in emails/plain/.
Test shared files - including email-header.php, email-footer.php, and email-order-details.php - across every notification that loads them. Never edit WooCommerce core. Keep presentation overrides in a child theme and business logic in a site-specific plugin. If a plugin supplies its own templates, register its template path with WooCommerce.
Record the exact file path so you can audit each override after updates.
Source:
wp-content/plugins/woocommerce/templates/emails/customer-processing-order.php

Child-theme override:
wp-content/themes/your-child-theme/woocommerce/emails/customer-processing-order.php

Plain-text override:
wp-content/themes/your-child-theme/woocommerce/emails/plain/customer-processing-order.php
Add Content With Hooks and Custom Email Classes
Use hooks to add content to an existing email. Use a custom class only when you need a new email. Add the message through a site-specific plugin, limit it to the intended recipient context, and escape the output.
add_action(
    'woocommerce_email_after_order_table',
    'acme_add_delivery_note_to_customer_email',
    10,
    4
);

function acme_add_delivery_note_to_customer_email(
    $order,
    $sent_to_admin,
    $plain_text,
    $email
) {
    if ( $sent_to_admin || ! is_a( $order, 'WC_Order' ) ) {
        return;
    }

    if ( ! $email || 'customer_processing_order' !== $email->id ) {
        return;
    }

    $note = $order->get_meta( '_acme_delivery_note' );

    if ( '' === $note ) {
        return;
    }

    if ( $plain_text ) {
        echo "\n" . esc_html__( 'Delivery note: ', 'acme' );
        echo esc_html( wp_strip_all_tags( $note ) ) . "\n";
        return;
    }

    echo '<p><strong>' .
        esc_html__( 'Delivery note:', 'acme' ) .
        '</strong> ' .
        esc_html( $note ) .
        '</p>';
}
These checks keep customer-only content out of other emails. Before publishing, confirm the callback arguments against the current hook or template.
For a new notification, register a custom WC_Email class through woocommerce_email_classes. Give it its own ID, explicit triggers, recipient and enablement checks, and separate HTML/plain-text templates. Use a stored event key or send flag to prevent duplicate sends.
Before documenting woocommerce_email_sent or woocommerce_email_disabled, check the installed source for availability, argument signatures, and execution timing. A send result does not prove inbox delivery.
Verify Block Editor Support and Template Versions
Before enabling the Block Email Editor, check support for the exact email type and template version. Confirm editor eligibility, active templates, and fallback behavior. Verify woocommerce_transactional_emails_for_block_editor only for email types supported by the installed release.
Match each override’s @version to the core template it overrides. After updates, compare source changes and update your version register for hooks, templates, classes, owners, and regression tests.
Style Emails and Choose Testing Tools
After customization, check readability and rendering in actual email clients before auditing performance.
Style HTML and Plain-Text Emails
Use body text around 16px, a recognizable logo, strong contrast, and generous spacing. Make link text descriptive: View your order tells readers more than Click here. Keep layouts simple and use conservative inline CSS, since CSS support varies across email clients.
Test mobile widths, dark mode, and blocked images - not just browser previews. Status, totals, taxes, shipping, payment instructions, and support details must stay readable without images.[6][7]
Include a plain-text version with clear labels and readable URLs, and test it separately. Plain text cannot use buttons, images, tables, bold styling, or tracked links.[1][8] Keep promotional offers out of transactional emails.
Choose Delivery, Logging, and Preview Tools
Use one active production transport integration. Before installing it, check current provider integrations, WordPress/WooCommerce compatibility, maintenance activity, and available features. Compare sending volume, logs, retention, and test limits - not just the license price.
| Role | Tool | Purpose | Limitations | Selection criteria |
|---|---|---|---|---|
| Mail transport | WP Mail SMTP or FluentSMTP | Route WordPress mail through SMTP or a provider API | Cannot guarantee inbox placement | WooCommerce and WordPress compatibility, authentication support, logs, and staging controls |
| Delivery provider | Postmark or Amazon SES | Send messages and expose delivery events | Requires provider setup and domain authentication | Suppression handling, event visibility, region, retention, and volume costs |
| Local capture | Mailpit | Inspect development mail without contacting customers | Does not provide production delivery or prove inbox rendering | Environment isolation, access controls, and message retention |
| Rendering QA | Litmus or Email on Acid | Check client-specific layouts | Does not test WooCommerce triggers or delivery | Required clients, dark-mode coverage, privacy, and test limits |
Test Order Emails, Account Emails, and Rendering
For every test, record the scenario, recipient, transport result, provider message ID, and final inbox result for the audit and handoff. Use sandbox payments and redirect staging mail to Mailpit.
Run the matrix below. Then inspect HTML and plain text in Gmail, Outlook, and Apple Mail on desktop and mobile. Check resolved variables, link destinations, totals, blocked images, and dark mode. Do not upload real customer data to preview tools.
| Scenario | Expected notification and recipient | Pass criteria |
|---|---|---|
| Pending, failed, on-hold, processing, completed, canceled, and refunded transitions | Customer and administrator notifications enabled for each applicable transition | Correct status, recipient, subject, and order data, with no unintended duplicate |
| Guest checkout | Customer email without requiring an account | Correct guest address, order link behavior, totals, and support instructions |
| Registered checkout and account creation | New-account email and order email to the customer | Correct account link, username or login instructions, order details, and privacy-safe content |
| Physical product | Customer and store notifications relevant to fulfillment | Correct shipping method, address, tax, discounts, quantities, and totals |
| Virtual or downloadable product | Customer download or completion email where configured | Correct download links, permissions, expiry, and product type |
| Taxes, coupons, shipping, and supported currencies | Customer order email and administrator alert | Currency symbol and decimal formatting, tax lines, discounts, shipping, and grand total match checkout |
| Partial refund | Refund notification where enabled | Accurate refunded items, quantities, amount, remaining balance, and payment wording |
| Customer note and manual order edit | Customer note email or manual order notification when triggered | Correct note content, recipient, order ID, and revised totals |
| Password reset | Password-reset email to the requesting account | Reset link works, expires as expected, and does not expose another user’s data |
| Administrator alert | Store recipient(s) configured for the event | Alert includes the right order context without leaking unnecessary customer data |
Troubleshoot Missing or Duplicate Emails
Use the same test matrix to separate rendering failures from transport failures.
Trace each step from event to inbox: order transition, settings, recipient, trigger, rendering, transport, provider event, and filtering. Match timestamps, order IDs, email IDs, and provider message IDs across records.
Start with WooCommerce → Status → Logs and the transactional-emails source, where available. WooCommerce documentation identifies this log as a place to check whether an email was attempted, failed before leaving the site, or was not attempted.[2] Then review transport and application logs. Inspect queues only if your setup uses them.
For duplicates, check repeated transitions, overlapping automations, repeated hooks, and retries. For missing mail, look for rendering errors, provider rejection, suppression, and spam filtering. Use provider logs and inbox checks to confirm what happened after WordPress handed off the message.
Restrict log access, redact reset and download links, and set a deletion schedule.
Monitor, Audit, and Hand Off the Email System
Once testing is complete, move from setup to regular monitoring and audits.
Measure Delivery and Customer Outcomes
Track application attempts, transport events, and customer results separately. Reuse the notification IDs and test scenarios from the setup audit so you can compare results.
Your weekly report should cover attempts, application failures, transport failures, provider acceptance, bounces, complaints, suppressions, delivery timestamps, and missing or duplicate messages. State the source, date range, and denominator for each metric - for example, acceptance ÷ attempts and hard bounces ÷ accepted messages.
Measure the median and 95th-percentile time from trigger to provider acceptance or delivery event. Label acceptance-only timing separately so it isn't mistaken for delivery timing.
For workflows you can measure reliably, track completed resets ÷ reset requests, paid invoices ÷ invoices emailed, and email-related support contacts per date range. Treat opens and clicks as secondary signals: privacy tools and automated scanners can distort them.
Audit Emails Regularly and After Updates
Reuse the inventory to spot drift after updates. Review logs, suppressions, and authentication monthly, and run a full audit quarterly. Run relevant tests after changes to software, payments, checkout, templates, hosting, or DNS.
Keep a dated checklist of enabled notifications, recipients, triggers, authentication, template changes, key fields, and legal copy. Record the versions of WordPress, WooCommerce, PHP, the theme, extensions, and custom code.
Define incident levels before launch:
- Critical: Missing required mail, whether needed for a core task or required by law.
- High: Major failures, duplicates, delays, or privacy leaks.
- Medium: An impaired workflow, recipient group, template, or integration.
- Low: Cosmetic or copy-only defects.
Assign an incident owner and client approver. During an incident, preserve evidence, pause risky changes, and restore the last known-good configuration. Confirm recovery with new order, failed-payment, and reset tests. Check for duplicates before resending.
Use audit findings and recent change history to identify stores that need a transactional-email review.
Find and Qualify Email Audit Clients
Use StoreCensus to qualify WooCommerce leads by platform, technology stack, country, revenue, and growth signals. Focus discovery on complex store workflows or recent changes.
Ask who sends transactional mail, when critical workflows were last tested, what changed recently, and who controls DNS and provider accounts.
External signals are leads, not audit findings. They don't reveal private email settings, logs, or delivery rates. Get authorization and verify the relevant evidence before proposing fixes.
Prepare the Client Handoff
Give the client an audit package they can use without you. The versioned package should contain the notification inventory, settings exports or annotated screenshots, template paths, hook/class register, integration details, test results, monitoring rules, rollback steps, and owners. Include enough detail for the next quarterly review to begin from the current baseline.
Share secrets only through an approved password manager. Record client approval of copy, branding, sender identity, recipient rules, and applicable legal review.
Assign named owners for DNS and provider accounts, alerts, monthly reviews, renewals, updates, post-update testing, and incident response. Record the next review date.
Conclusion: Keep the Email System Tested and Maintained
Treat WooCommerce transactional emails as production infrastructure. Check triggers, recipients, delivery, and who owns the system, then retest after every change. Delivery checks provide the final proof that everything still works.
A preview only shows the layout. Real order and account events prove delivery.
Turn those checks into a repeatable regression checklist, and run it after every store change. Keep the test steps alongside configuration and customization records so the next maintainer can retest quickly.
FAQs
How can I resend missed emails without creating duplicates?
Before you resend a WooCommerce email, check why it failed. Go to WooCommerce > Status > Scheduled Actions and look for stalled tasks. Then use WP Mail Logging or Check & Log Email to see whether the email was passed to your mail server.
If the logs show that the original email was already processed, don’t resend it manually through order actions. Doing so can send duplicate notifications to the customer.
Will switching themes break my custom emails?
Generally, no. WooCommerce emails use the plugin’s own templates or custom overrides in your child theme. Keep overrides in a child theme, not the parent theme, to protect your changes when the parent theme updates.
If you edited email templates directly in a parent theme, move those files to your new theme or a child theme so your customizations carry over.
How long should I retain email logs?
The provided materials don’t set a required retention period for WooCommerce transactional email logs or identify an industry standard or regulatory timeline. Choose a retention period based on your organization’s day-to-day needs, storage capacity, and data management policies.