Wix SwiftXR Setup Guide
Step-by-step Wix SwiftXR setup and QA: install on the correct site, upload optimized GLB models, map products, and test AR on real phones.

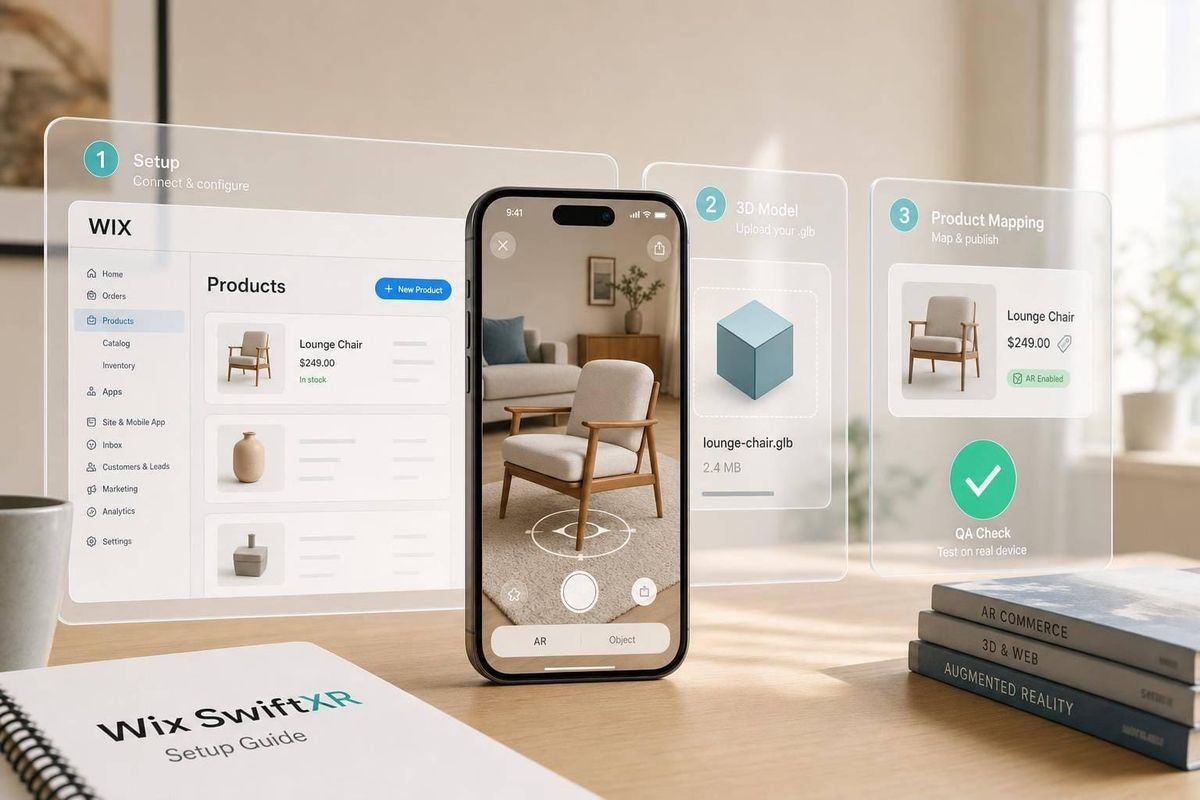
If your Wix SwiftXR setup fails, it usually comes down to one of five things: wrong site install, hidden viewer, bad model scale, wrong product link, or weak phone testing.
I’d sum the process up like this: install the app on the correct Wix site, place the viewer where shoppers can see it, upload a properly sized 3D file, connect that file to the matching product, and test AR on at least one iPhone and one Android phone before launch. For most stores, a GLB file in the 2–10 MB range and about 5,000–50,000 triangles is a solid target, and mobile load time should land around 3–5 seconds for the viewer and 3–7 seconds for AR launch on normal U.S. cellular service.
Here’s the whole article in plain English:
- I start with the setup checks: Wix Stores must already be live, product data should be final, account access must be in place, and 3D files need proper scale.
- I point out a common mistake: Wix apps install per site, so adding SwiftXR to the wrong site links the wrong store.
- I cover where to place the SwiftXR viewer on the product page and when to use inline display vs. a modal trigger.
- I explain how to create a SwiftXR project, upload the model, publish it, and paste the live URL back into the Wix widget.
- I break down product linking, including when to use one project per SKU and when a shared project across color or finish variants is enough.
- I show what AR should do on iPhone and Android, including device and browser checks.
- I end with the pre-launch QA pass: blank viewer, missing AR button, wrong model, slow load, scale problems, texture issues, and layout conflicts.
A key detail: U.S. product copy may use inches or feet, but the 3D asset still needs to be built to proper physical size, often in meters, before export.
This is a setup-and-QA guide, not a sales pitch. If I were handing this to a team, I’d treat it like a launch checklist with sign-off at each step.
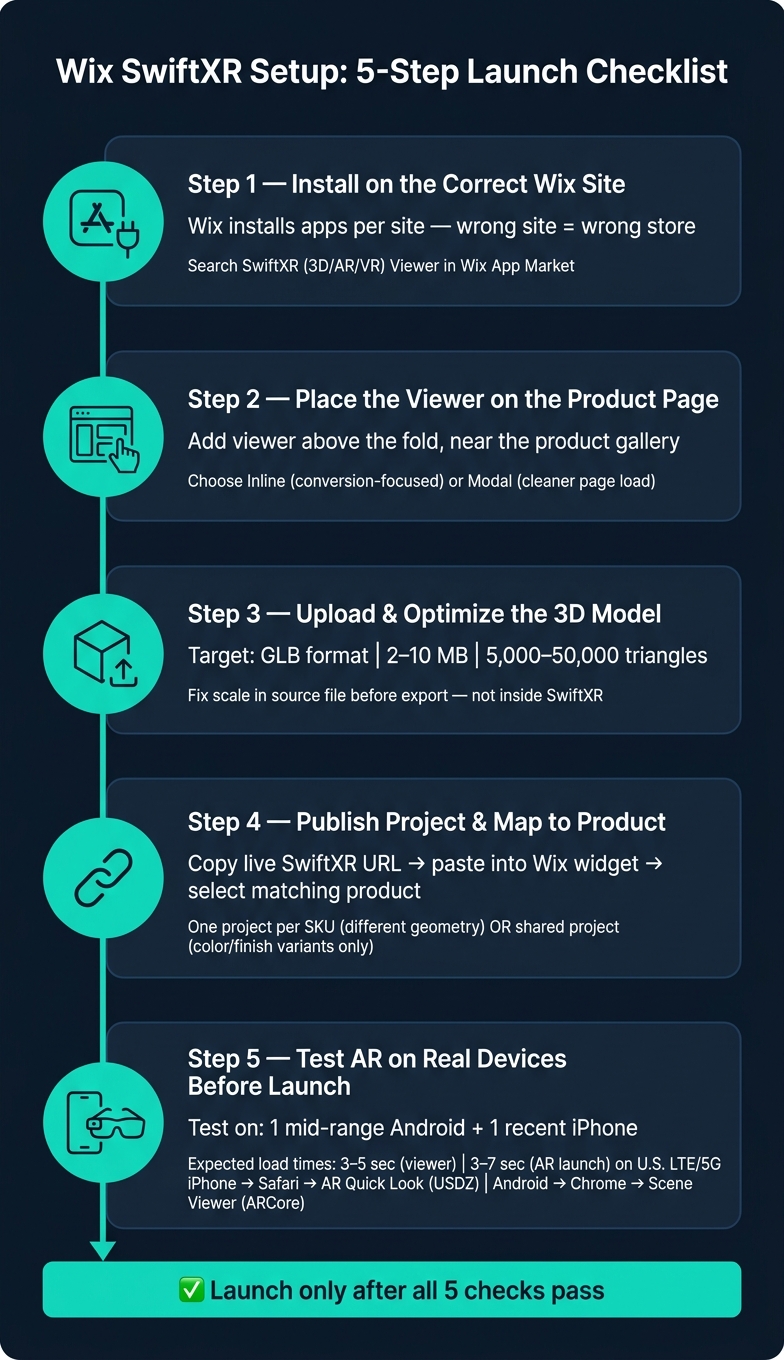
Wix SwiftXR Setup: 5-Step Launch Checklist
Bring your 3D/AR/VR Content to your WiX Website (SwiftXR x WiX)
sbb-itb-61169e3
Install SwiftXR and place the viewer on the Wix product page
Next, install SwiftXR on the right Wix site and add the viewer to the product page.
Install the SwiftXR app from the Wix App Market
Open the correct Wix site itself, not the account dashboard. Wix installs apps on a per-site basis, so if you pick the wrong site, SwiftXR connects to the wrong store. From the editor, go to the App Market and search for SwiftXR (3D/AR/VR) Viewer. Then click Add to Site and approve the permission prompt so the app can access store products and pages.[7]
Finish the account connection flow, and write down the login email and workspace. Only note the plan tier if you need it for client budgeting.
Once the app is connected, head to the Product Page template and add the viewer.
Place the SwiftXR widget on the product page
Open the Product Page template, drag in the SwiftXR Viewer, and place it close to the product gallery, above the fold.[2][6]
That spot tends to make the 3D experience easier to notice without making shoppers hunt for it.
With the viewer in place, the next step is uploading the 3D model and linking it to the product.
Inline viewer vs. modal launch: which to use
Pick the display mode that fits the page layout.
Use inline placement when 3D plays a big part in conversion. Use a modal button when you want a cleaner page and a lighter initial load.[2][3]
After the viewer is placed, create the SwiftXR project and map the model to the correct Wix product.
Create a SwiftXR project, upload the 3D model, and map it to a product
Open SwiftXR Hub, create the 3D project, and then connect it back to Wix.
Create a project and upload a 3D model file
Log into SwiftXR Hub, click Create Project, and name the project with the SKU or product name. Once it opens, go to Components → 3D and drag either a 3D viewer or AR viewer onto the canvas. Then upload the prepared 3D file. For most products, GLB is the best pick. [5][10][8]
Before you upload anything, check the model's real-world scale in your 3D tool. If the size is off, fix it in the source file instead of trying to correct it inside SwiftXR. That saves headaches later, especially in AR.
For performance, try to keep most product models in the 2–10 MB range, with polygon counts around 5,000–50,000 triangles. That’s usually a good target for smooth interaction on mid-range iPhones and Android devices. [13][12][14]
After the model is in place, publish the project and connect it to the matching Wix product.
Publish the project and link it to the correct Wix product
Once you've set the viewer options - like camera controls, surface type based on the product, and AR launch mode - click Publish in the top-right corner of the SwiftXR editor. Copy the live URL and paste it into the Wix widget. [1]
Back in the Wix editor, select the SwiftXR widget, paste the published URL into the mapping field, and choose the matching product from the selector. Save and publish the Wix site, then open the live product page and make sure the right model shows up on the right product.
It also helps to track each SKU, Wix product ID, and SwiftXR URL in a single sheet. When you’re dealing with more than a few products, that simple habit can save a lot of back-and-forth. [2][9]
Once the mapping is saved, move to mobile AR testing.
One project per product vs. one shared project across variants
This choice depends on how much the variants differ.
If the geometry or dimensions change between SKUs, each one needs its own project so the AR scale stays correct. But if the only difference is color, fabric, or finish on the same frame, a shared project with swapped textures can cut setup time a lot. [9][11]
| Approach | Setup Effort | Maintenance Overhead | Variant Accuracy | Best Fit |
|---|---|---|---|---|
| One project per SKU | High | High | Maximum - exact geometry and scale | High-ticket items, shapes that differ, or size variants |
| Shared project across variants | Low | Low | Moderate - shared geometry only | Same shape, different colors or materials |
Use the option that matches how the product changes from one variant to another.
After mapping is saved, test mobile AR launch behavior.
Test mobile AR behavior and fix common setup errors before launch
After you finish mapping the project, do a full QA pass on real devices before launch. Don’t stop at a saved mapping. Open the live product page on actual phones and test the whole flow end to end.
How AR should launch on iPhone and Android
The flow should be straightforward: open the product page on mobile, use the 3D viewer, tap the AR button, and launch the AR session.
On iPhone, Safari should open AR Quick Look with a USDZ asset. On Android, Chrome should open Scene Viewer or browser-based AR. The device also needs to support ARCore, run Android 7.0 or later, and have updated Google Play Services for AR and the Google app.[15] When the session ends, the shopper should be able to close AR and return to the product page without broken navigation or a full page reload.
Test on at least:
- one mid-range Android phone
- one recent iPhone
On a normal U.S. LTE or 5G connection, the 3D viewer should load in about 3 to 5 seconds, and AR should open in about 3 to 7 seconds after the button is tapped.[17] Test this in normal browsing conditions, not only on spotless lab devices. A living room or office works well, with overhead lighting and surfaces like hardwood, carpet, or a countertop.
The placement indicator should appear within a few seconds after the device starts moving. The model should also stay steady as the user walks around it. If surface detection feels shaky, add on-screen prompts and check that both the iPhone and Android launch paths are set up the right way.
Make sure the AR control is set to always visible. Hover-only settings and mobile breakpoints can hide it on phones.[4] Also check that it hasn’t been pushed below the fold by long page content or covered by a sticky add-to-cart bar or chat widget.
Pre-launch QA checklist: linking, layout, files, and AR
If a test fails, match the symptom to the fastest fix below.
| Error Category | Symptom | Likely Cause | Fix Steps |
|---|---|---|---|
| Unpublished project | Viewer shows blank or an error | SwiftXR project not published | Publish the project, then republish the Wix site and retest. |
| Wrong mapping | Wrong model appears on a product | Linked to the incorrect Wix product or SKU | Reconnect the project to the correct product and verify variant logic. |
| Hidden control | AR button missing on phone | Hover-only behavior or mobile breakpoint rule | Set the control to always visible and check responsive settings in Wix editor. |
| Oversized asset | Slow load, blank viewer, or laggy AR | Large 3D file or uncompressed textures | Reduce model size, compress textures, and retest on cellular data. |
| Bad scale | Product appears giant or tiny in AR | Unit mismatch or incorrect model scale | Fix scale in the source 3D file and re-upload. |
| Missing textures | Model loads flat or broken | Textures not bundled in export | Re-export with embedded textures and verify on device. |
| Layout/clipping issue | AR button is hard to tap, viewer is clipped, or buy box is blocked | Widget overlapping product UI or container dimensions too small | Reposition the widget, adjust container size, and test against mobile layouts. |
| AR controls blocked by CSS | Button is visible but won't tap | z-index or pointer-events conflict | Remove blocking layers and inspect CSS stacking order. |
If something still looks off, use browser dev tools to inspect the iframe container. Check display, visibility, height, width, and z-index. It’s a simple check, but it often points straight to the issue.
You should also temporarily disable any custom CSS added through Wix custom code. That makes it easier to confirm whether the widget works on its own. And make sure the full AR flow is served over HTTPS. Apple’s AR Quick Look ignores AR resource requests that aren’t delivered through a secure context.[16]
Conclusion: The Minimum Launch Standard for a Wix SwiftXR Deployment
Once QA is done, launch only after five checks are done: the right app is installed, the viewer is visible on the page, the 3D model scale is right, the product mapping is right, and AR has been tested on an actual device.
If you skip one of these, the experience can break with no clear error. And sometimes the problem doesn't show up until shoppers land on the product page.
Make this checklist part of your SOP. Assign an owner to each step, and require sign-off before anything goes live. That's how teams keep launches repeatable.
SwiftXR works best when setup, mapping, and device testing are handled like launch gates, not loose to-dos.
FAQs
Do I need a separate SwiftXR project for each variant?
No. You don’t need a separate SwiftXR project for every product variant.
You can link specific product variants right to your 3D customization options. That means you can handle multiple versions in one place, without setting up extra projects you don’t need.
What file format is best for Wix SwiftXR?
GLB is the recommended file format for Wix SwiftXR because it gives you solid performance and broad support for 3D models.
It works well for web-based AR and helps keep rendering more consistent across mobile devices. Before you upload anything, optimize your 3D assets for the web so pages load smoothly and mobile performance stays strong.
Why does AR work on one phone but not another?
AR relies on the hardware and software inside each device. So if it runs on one phone but not another, the unsupported device is usually missing the right sensors, the required operating system version, or browser support for WebAR.
Agencies should first check that the mobile device works with current AR frameworks and that the browser is fully up to date. After that, they can look at model performance and asset optimization settings.